Friday, January 29, 2010

Monday Teaser...

So I'm going to post something on Monday that I've never posted before. I'm going to try and be a little more pro-active with connecting to fellow crafters online, so be sure to check back. February is a new month & there might be lots of fun & exciting FeltedChicken shenanigans coming.....

Sneak Peak....
It just might have something to do with this....


Sharing the Blog Award Love!!!

I was so humbled this week by being nominated by 2 different Bloggers for this awesome Blog Award!! I've been feeling a bit beat down this week & this definitely lifts my spirits!!

Thank You Eugena's Creations & Butterscotch Grove for nominating me for this Blog Award!!

(And yes, I'm going to cheat & nominate them back for the award, but whatever, they have great blogs & I want to give the love back!)


The Sunshine Award is awarded to bloggers whose positivity & creativity inspires others in the blog world.
The rules for accepting these award:
Put the logo on your blog or within your post.
Pass the award onto 12 bloggers.
Link the nominees within your post.
Let the nominees know they have received this award by commenting on their blog.
Share the love and link to the person from whom you received this award.


So here are my 12 nominees:

http://www.craftypod.com/

http://cuteable.com/

http://dabbled.org/

http://www.ellifolks.com/blog/

http://thefunkyfelter.blogspot.com/

http://eyesoftime.blogspot.com/

http://needlefeltedart.blogspot.com/

http://curiouspug.blogspot.com/

http://eugenascreations.blogspot.com/

http://butterscotchgrove.wordpress.com/

http://thursdaysweettreat.blogspot.com/

http://salvagenation.blogspot.com/

Please check out a few of these amazing & inspiring blogs. Some of these blogs are new friends, some are old friends, and some are my secret Blog-crushes!!

Wednesday, January 27, 2010

Cooking on a Budget...

So yesterday was the first (of many I'm sure) Job Hunting Days. Yep, being poor sucks, and with movie production in Los Angeles down like 20% in the last year, my prospects of landing a great paying Union Gig are next to nothing. I'm okay with that I guess, it's been 10 years of hard work and ups & downs, but I think it's time for a new stage in my life... We'll call it the "FeltedChicken Era". But since my little felting business can't support me right now, I've been learning to shop on a budget & need to find a day-job to help pay the bills.

So I'm willing to share some of my secret tips to cooking on a budget (which you probably already know, but I'm slowly learning).....
  • Even though it's pretty gross, roasting a chicken at home is pretty cheap & delicious!! We used to buy the store roasted chickens, but for the same price I can get twice as much chicken! I was surprised to have to pull the guts out of the chicken, but it's well worth saving the few dollars.
  • Stock up on FROZEN VEGGIES!!! This is my favorite cause I can beef up any meal by just adding a couple cups of mixed frozen veggies to anything. I add them to tacos, chili, pasta, roasted meat, etc. And they might not have quite as many nutrients as the fresh ones (slightly) you can get pounds of them for a couple bucks!
  • Make Tofu your friend. Tofu is a great protein substitute that is comparatively cheap. I use Tofu in my taco & lasagna. It's a great filler coupled with some frozen veggies, that costs only a couple bucks.
  • Shop the "Bulk / Discount " stores. We don't have a membership to Costco or anything, but we have a local bulk grocery store called "Smart & Final", some places have "Sack 'n Save", "Food for Less", etc. They don't have the widest selection, but you can get meat cheap, buy gallons of Soy Sauce (which runs like water in my house), and one of the best things I've gotten there, a giant box of Mashed Potato Packs. I got like 12 for $8 & they are super fast & easy to make in the microwave. OH, also got like 2 pounds of whole-wheat pasta for like $5.
So those are a few of my cheap eat'n tricks. If you live, or have ever visited California you know that the "cost of living" is slightly above average here. Gotta watch those grocery ads & learn how to cook. I personally HATE to cook, but am slowly learning cause it's the best way to eat healthy & watch your wallet. If my boyfriend had it his way, we would order Take Out (preferably steak) every day. At $50 a meal, that's really why I'm kinda in control of the house-hold finances!!!

*Went to Home Depot yesterday & am going to start building the mechanical parts for the Koi & Frog today!!! I'm no carpenter, but I can use a circular saw & screw gun, so it shouldn't be that difficult!!!

** Totally just jinxed myself....

*** OOHHH!!! And I don't care to hear what your Political views are, or tell you mine, but remember to watch the "State of the Union" speech tonight. It's everyone's responsibility to be informed on what's going on in our nation. The more we all know, the stronger we will be. I never miss it, been watching it for like 10 years, it's kinda like my SuperBowl!!

.

Tuesday, January 26, 2010

Koi & Frog all Painted....

So got some basic picts I wanted to share with you guys of the Koi Fish & Frog all airbrushed & ready for their mechanical parts. I still need to go to Home Depot & get the wood for their boxes, but I'll do that today cause I will be out anyways. Hope the rain we are supposed to get holds off till I get back home!!

Koi Fish Painted:

So went with a dramatic Tattoo Look. Right after I painted him, I was iffy about the shading (I tend to have a really heavy hand cause I'm no airbrush expert), but he's growing on me. Now I just need to build the box & mechanical crank parts. I'm gonna go with black for the wood parts, and add the couple cherry blossoms or lotus flowers to accent his tattoo-ness.


Painted Koi 1 Painted Koi 2

Painted Koi 3 Painted Koi 4


Frog Painted:

I'm happy how he turned out with his shading. I was going to add some warty-type details on his back, but am rethinking that. I kind of like his generic look, almost a little more fanciful. He's soft & pretty. I'm probably going to make his box & mechanical parts blue (like water) and maybe have him sitting on a lily pad. Gotta think about it.

Painted Frog 1 Painted Frog 2

Painted Frog 4 Painted Frog 3

Monday, January 25, 2010

Amazing Artist...

So just had to link to this Artist I saw on one of my favorite Blogs - Make: Online - It's the more Macho Brother of Craft: Online. It usually posts about all sorts of Tech-type subject or (in this case) AMAZING ARTISTS!! I just had to link to Matthew Albanese's website because I was blown away by the amazing photographs. He creates miniature landscapes, lights them, then photographs them. It's amazing to see each photo then read the Materials list, which includes things like "cotton, steel wool, sugar, paprika...".

Freak'n Amazing!!


BRAND NEW KITS!!!

So I've been wanting to make these for a while, had a few at the Unique L.A. show, and finally got to list them in my shop! The very first ever Needle-Felting Kits by FeltedChicken!!! Yea!! There are 3 kits (as of now) and I'm sure you won't be surprised by what the kits are. All 3 are pretty FeltedChicken-ish. Each Kit has Wool, A Felting Needle, Photo Instructions, Felting Tips, Online Recource List, and are available in my Etsy shop for $15.
So here you go.....

Needle-Felting Kit: Tuna Sushi


Tuna Sushi Kit Includes:

* Quart Sized Plastic Container for storing wool & parts
* Enough material to make (2) 3" pieces of Tuna Sushi
* 0.5 oz of White Eco Friendly Core Wool - to use as the base
* 0.2 oz of Red Kool-Aid dyed Romney Wool - for Tuna parts
* 0.1 oz of White Romney wool - for the Rice parts
* 12" x 4" Black Pre-Felt Wood - for the Seaweed parts
* 1) 38 gauge Felting Needle
* 1) Rubber Finger Protector - to help prevent pokes
* Full Color Instruction Pages, Felting Tips, & Resources


Needle-Felting Kit: Eco Friendly Globe


Eco Friendly Globe Kit Include:

* Quart Sized Plastic Container for storing wool & parts
* Enough material to make 1) 3" Globe
* 0.5 oz of White Eco Friendly Core Wool - to use as base
* 0.4 oz of Blue EcoWool - to use as water
* 0.1 oz of Green EcoWool - to use as land
* Tuft of White EcoWool - to use as ice for the poles
* Tuft of Brown EcoWool - to use as desert
* 38 gauge Felting Needle
* 1) Rubber Finger Protector - to help prevent pokes
* Color Photo Instructions, Felting Tips, & Resources


Needle-Felting Kit: General Kool-Aid Dye


General Kool-Aid Dying Kit Includes:

* Quart Sized Plastic Container for storing wool & parts
* Enough material to make whatever you want!
* .5 oz of White Eco Friendly Core Wool - to use as base
* .3 oz of undyed White Romney Wool - to dye
* 38 gauge Felting Needle
* 1) Rubber Finger Protector - to help prevent pokes
* 1) Pack of Kool-Aid - your color choice
* Color Photo Instructions, Felting Tips, & Resources

Friday, January 22, 2010

The Koi is Coming....

So I just realized that I haven't shared any process picts of the Koi Fish that I've been working on. He's being sculpted as we speak. He's been dyed & is currently getting his pre-paint detail. I decided to make him REALLY Tattoo inspired, so I'm going with the black outlines and detail right now. He will have airbrushed shading, then final detail. I haven't done his face yet, just cause doing all the line detail takes a long time. Hope these picts get you excited about seeing him finished!!! I really like how his scales are turning out!!


And I hope everybody has a GREAT WEEKEND!! We don't have any plans, as of now, but hopefully if it finally stops raining, we can get out of the house!

Thursday, January 21, 2010

Still Raining...

Since it's still raining outside, I've been less than motivated. So don't have much to post today. Here are a couple more picts of the Frog. He's all sculpted, now just gotta wait till the rain stops so I can airbrush some shading & color on him.


★★★★★★★★★★★★★★★★★★★★★★★


We got some movie tickets for Christmas & we have been searching out what we want to see. My boyfriend is OBSESSED with watching movie trailers, and had to share this one with you! It looks AWESOME!!! Doesn't come out till April, so I'm crossing off the days on my calendar!!

Tuesday, January 19, 2010

Featured Blogger - NICO Designs!

**Thanx for all the comments about Crafts Shows yesterday!! It was awesome to see the variety of ideas that people have. I think it gave me a lot to think about, but I agree with your guys, definitely showcase my sculptures with my own "voice" coming through the displays.... BUT... I think I can capitalize on the Girly, Spring Feel of the show with a few specific items... Yea.. that sounds about right...


It's January & since I've been really bad about keeping up with the requirements of my EtsyBlogger team, I wanted to be sure that I got them done this month!! So I'm writing today's post on my fellow EtsyBlogger..... NICO Designs.


I LOVE LOVE LOVE these little stuffed pears that NICO Designs has in her Etsy Shop right now. They are PERFECT for the season & are made from cotton fabric scraps & eco-spun Felt.

I think NICO has a great eye for the interesting patterns she uses in her items. I like the retro feel of the patterns, they might be scrap, but they look vintage!


NICO Designs has also started to create these sweet little Art Dolls. On Blog she gives a little background about what inspired each one. They are lovely and, again, have a very retro, maybe even Art Deco feel to them. They kind of remind me of those figurative antique jewelry stands.

Also be sure to check out NICO Design's Blog!! She has all sorts of neat stories about her art, and (from a fellow blogger point of view) has a great Blog Design. I like how she post's a kind of "Question of the Day" and has links to "You might like this".


Now that I'm blogging more, I guess it's time to try and update & innovate my blog design!!! It's just that I loved reading all the comments yesterday & need to figure out how to get you guys talking more!!!


.

Monday, January 18, 2010

Rain, Rain, Go Away...

So it is the beginning of a long week of rain here in SoCal. They are predicting that it could be the worst rain storms in the last decade, which kinda sucks cause my house is old & totally not rain-proof. Also, when you live in a place where it rains like days out of the year, it's annoying cause I count on having warm, dry days to help with crafting. I work a lot outside with painting, or hanging things to dry, or taking pictures. Well, glad I got a bunch of stuff photographed last week, cause it's going to be a while before I get out there again.

So here are some awesome in-process picts of my jumping frog!! He's all dyed & has his joints put in. I put grommets in the joints to help protect the felt, then put some small nuts & bolts in to have the movement. I just need to finish the detail on him, add a couple more joints & make the box & hardware, still a lot to do to finish, but he's coming along!!

upload pictures
Upload pictures


★★★★★★★★★★★★★★★★★★★★★★★

Question for my Fellow Crafters!!!

So I've got a question to those of you that sell at Craft Shows regularly:

Do you customize your table or booth display for each show or season... OR... Do you just keep the same setup for every show?

I'm going through my products & thinking about what I want to sell & how I want to display it for the upcoming show Pink Parlour Festival. I see that it's about 2 weeks before Easter & was wondering how many of you really tailor your products to the holiday or even the feel of the show. If you are selling at a more Artsy Show, do you feature more fine art pieces, or a more Crafty show, do you show more hand-made DIY stuff?

Or do you even think that much about it?


.

Sunday, January 17, 2010

2010 Resolution #1... CHECK!

So I get to check off my first FeltedChicken 2010 Resolution! The first thing that I wanted to focus on was getting more involved with selling at Craft Shows. I just sent my payment for my first show of 2010!!! I'm excited and have a lot of work to do, although not nearly as much work as last time!!!


So if you are in the Los Angeles area, stop by and find me!! I'm getting an 8' table this time instead of a 10' x 10' booth. I'm hoping that this won't be as overwhelming as last time & I can focus more on featuring my best products instead of just throwing everything into the space to fill it up! Maybe I will work my way back up to a booth some day. A table is more manageable & cheaper!!

★★★★★★★★★★★★★★★★★★★★★★★★★★★★★★

And my Etsy assault has started! Got several new items listed in my shop! Got some cute Valentine's Day (re)GIFT BAGS, and some more Sushi Magnets! Be sure to stop by and check them out!

Sushi Magnet Set 2Small (re)GIFT BAG - XOXO 2

Saturday, January 16, 2010

A Paranoid Saturday Night Post....

So, I don't know if it's the fact that I've been listening to the CNN coverage of the catastrophic Haiti Earthquake all day, or the fact that (I'm not gonna lie) I've had a couple of glasses of my favorite Boxed Wine, but I saw a post on one of my favorite blogs about having a 72 hour Emergency Plan. It got me thinking, cause I live in a place that fears to have a mega earthquake & could possibly fall into the Pacific Ocean.

While at home this Christmas, my Dad & I had a conversation about what to do in case of an earthquake. He's a structural engineer & knows a hell-of-a-lot about what happens to your house during an earthquake. He gave me a great bit of advice that I think about everyday. He said that if you are involved in an earthquake, the best thing to do (contrary to the popular belief of standing in a door way) is to crouch down near a large piece of furniture, like a couch or cabinet. This way, if a floor of your building were to collapse, you might be able to hangout in a small space that is left after the furniture takes the majority of the impact. Or if there is time, run to your staircase. The stairway in a building is one to the strongest areas of the house cause there are multiple walls that surround it.

I want to share this link with you also:

Building your Family's 72 Hour Kit

It just gives you a great guide-line for what you should have on hand in case you are involved in an emergency. They say you should have a 72 hour kit because in the event of a catastrophic event, emergency services might not be able to help you for 72 hours, and up to 6 days. It's been 4 days after the Haiti Earthquake & there are so many people that are in desperate need of aid.

So there is my paranoid, slightly drunken post for the day. Please check out the link, cause even if you don't get everything on the list, at least it might get you thinking. It's got me thinking, and I THINK that I might grab a few more canned goods to store in the pantry the next time I go to the grocery store.

And to quote our not-so eloquent former President regarding the Earthquake in Haiti:

"I know a lot of people want to send blankets or water... Just send your cash."

...

Friday, January 15, 2010

An All-Out Esty Assault

So finally got pictures of some of the new items that I made for the Unique L.A. show last month. I have enough items to list 3 a day for like a week, plus more I have to still photograph. So starting (probably tomorrow cause I have some stuff I need to get done today), I will be listing LOTS & LOTS of new product in my Etsy shop.

Here's a preview of some of the new stuff I will be listing in the next week:


Thursday, January 14, 2010

Spreading the Geek

Thought I'd just share a bit of my geekiness with you guys today. I'm working on 2 felted sculptures, but don't have pictures to share yet. In the mean time, I've been watching the first season of the awesome PBS documentary series. If you don't know by now, I'm an UBER dork, and proud of it!! I can watch boring documentaries about pretty much anything (except war shows, not really into that). But science, history, art, religion, etc. This show is called
Art:21 - Art in the Twenty-First Century.

It's not the most action-packed show out there, but I think it's neat and inspiring. They basically go into a contemporary artist's studio & talk with them about whatever. It's not an interview, it's more like a monologue. Sometimes the artist is very descriptive of their process and inspirations, and sometimes they just talk all artsy-fartsy & philosophical-like. Depends on who the artist is. Some shows are better than others, but I feel like making art after I watch them, so it's doing it's job!!A

More info about Art:21

Art in the Twenty-First Century is a groundbreaking documentary television series focusing exclusively on contemporary visual art by artists working in the United States today.

The series provides behind-the-scenes views of the artists in their studios, homes, and communities. The artists speak directly to the audience, in their own words, about how, why, and what they create....
While many programs about visual art look to the past, Art:21 presents a diverse group of both established and emerging artists working in America today and to the art they are producing now. The ongoing goals of this project are to enlarge the definitions and comprehension of contemporary art; to minimize the intermediary positions of curator, gallery, and museum as arbiters of taste and value; to offer viewers, teachers, and students a straightforward experience of the artists and their work without interpretive mediation; and to encourage viewers and students to participate in interactive and outreach programs. The underlying philosophy of this project is that contemporary American art is of real interest to a national audience. By making contemporary art more accessible, the series affords viewers and students the opportunity to discover their own innate abilities to understand contemporary art and to explore possibilities for creative thinking and self-expression.
I'm not the biggest fan of "contemporary art". When I think of "contemporary art" I think of splashy painted canvases, or giant abstract wood sculptures, or an instillation space filled with rotting meat to show the decay of the western culture or something. Can you tell I'm kind of jaded with modern art? Anyways, I was a little hesitant to watch this show, thinking it would be filled with super-conceptual artists, but it's (mostly) not. There are some really cool artists, and it's definitely expanding my idea of what "contemporary art" is.

Here is a clip from one of the shows, I have only seen the first season (there are 5!), but I picked it cause you probably know the artist, Jeff Koons.


Wednesday, January 13, 2010

DONATE! DONATE!!

So unless you have been living under a rock, then you have heard about the TRAGEDY of the earthquake in Haiti. I visited RedCross.org, and made a small donation to help the 3 million people that need aid. Everyone can spare a little bit (forgo buying that name brand Toilet Paper this week). This is so tragic, I heard that anywhere from 100,000 to 500,000 people have died.


American Red Cross Pledges Initial $1 Million to Haiti Relief

Send a $10 Donation by Texting ‘Haiti’ to 90999

Call (202) 303-5551 to speak with an American Red Cross spokesperson.

National Headquarters
2025 E Street, N.W.
Washington, DC 20006
www.redcross.org


State Department sets up toll-free number for information about Americans in Haiti -

The toll-free number to call for information about family members in Haiti is 1-888-407-4747. The State Department advises that some callers may receive a recording because of heavy volume of calls.

**Sorry for the hodge-podge of info here, and I'm sure that if you are affected by this tragedy, that the last thing you would be doing is reading the "FeltedChicken" Blog, but I wanted to inform everyone of all the information.

Monday, January 11, 2010

Lovely Feature!

Had a nice surprise this morning when I saw that I was featured in an article on MyShoppingConnection - Great Finds for Fine Living. It is a beautful & comfy post called "Warm by the Fire". Inspired, I'm sure, by the arctic freeze that is gripping most of the United States right now... except, of course, here in Southern California where it's been in the 70's and 80's for the past couple weeks.

Please check out my Felted Log on the "Warm and cozy fireplace finds on Etsy!" post!!


Round Yule Log 3

Wet-Felting a Vessel Tutorial

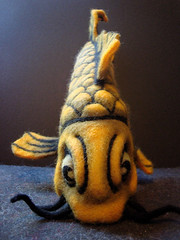
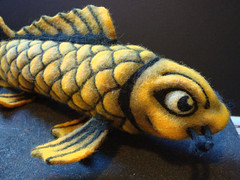
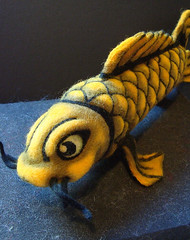
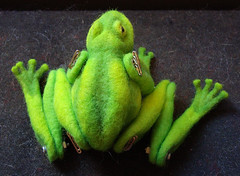
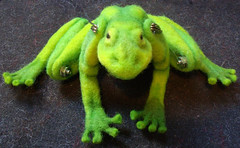
Here is a MONSTER of a tutorial for your viewing & crafty pleasure. I made this Felted Vessel to use as the body for my future Koi Fish Sculpture. I wanted a hollow body to help with the ease of movement when it shakes it's head and tail back and forth.

Have to give credit for these fellow felters and their Felted Vessel tutorials that inspired me and gave me some ideas on how to go about doing this....

Zed of the UK Flickr Tutorial
SpiderFelt Blog Tutorial
Lexis on Craftster.org Forum


Felt Vessel Tutorial 2
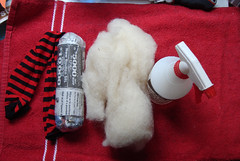
These are the materials you will need for your felted vessel:
  • A pair of Nylon Stockings
  • A towel to soak up all the water (you will use alot!)
  • You felting form
  • Some fluffy wool (I used layers of core wool, then white Romney)
  • A spray bottle filled with Hot Water & some dish soap


Felt Vessel Tutorial 1
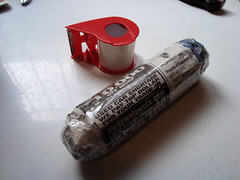
I first started by creating a shape to felt over by crumpling up some Newspaper and then covering it with clear packing tape. I wanted a custom cylinder shape, but you could pretty much use any shape you want. You can felt over a bowl, or basketball, or balloon, or probably even a styrofoam shape. Anything works (as long as it's water-proof, which is why I used the packing tape to seal the paper in).


Felt Vessel Tutorial 3

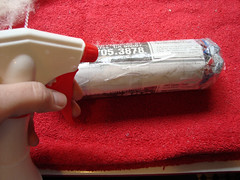
Felting with raw wool roving can be a bit sticky, literally. If the wool is not wet, it will sticky to your hands. I tried to help the layout of the wool a bit by wetting the form first. You can get the fluffy wool to stick in place if the layer below is wet.


Felt Vessel Tutorial 4
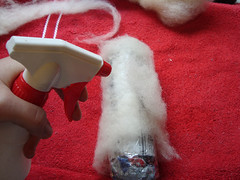
Now it's time to start putting down the layers of wool. You want to layer the wool in alternating directions. So I first pulled the wool into thin tufts & placed them down running the length of the form. Then spray it down with you hot, soapy water.

*You can use colored wool while putting down the layers! This is where you might come up with some awesome color schemes, like having the inside a different color than the outside. You can also use more wispy tufts of colored wool to create shading or flowing colors. Have fun with this step, be creative!!!


Felt Vessel Tutorial 5

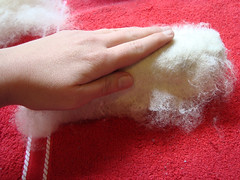
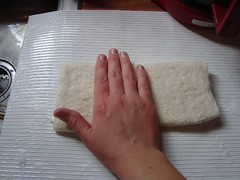
The best way to get the fluffy wool stuck down is to pat is. You don't want to start rubbing the wool because the fibers will slide around, and then you might end up with uneven felt. So just pat the wet wool down till it gets completely saturated with the soapy water.


Felt Vessel Tutorial 8
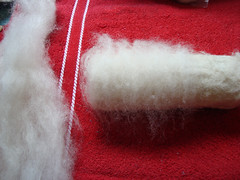
I laid out 3 layers of Core wool (in alternating directions) then I started on the Nice White Romney layers. I want a pretty thick, strong piece of felt in the end, so I laid out a total of 6 layers of roving. It's pretty thick, I think you could use less. But the thicker the felt, the stronger your vessel will be, and it will be able to stand up on it's own. **Notice the different direction of this layer, going width ways around the form.


Felt Vessel Tutorial 9


Be sure to watch your edges. When I was finish with all the layers, I pinched & tucked in the fluffy edges of the form. My cylinder has 2 open ends to help with incorporating it into the fish later, but you could just close off one end & you get an awesome vase or tube! Just be sure to layer the bottom with alternating wool while you are laying out the sides. This way it will be connected well.


Felt Vessel Tutorial 10


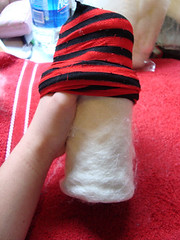
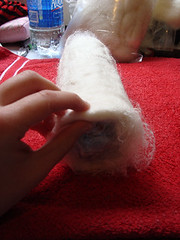
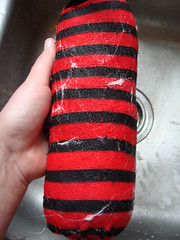
Now, the trickiest part of the whole project. You might want to get a friend to help you with this one (depending on how big you vessel is). Sorry I only had a pair of red & black striped tights that were big enough to cover the cylinder!! **CAUTION!! Be careful when you put your piece into the stocking. You don't want to disturb the fibers too much, they have not begun to felt yet, and they could slip & slide around messing up all your hard layout work!!


Felt Vessel Tutorial 11


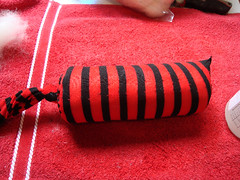
There! My felted piece all tied up in the nylon stocking!! Looks kinda like a sausage, a giant sausage!!


Felt Vessel Tutorial 12

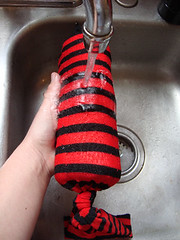
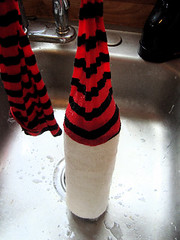
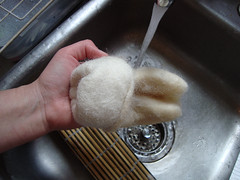
Finally time for some felting! Wet your wool form with some really hot water (hot water and frictions are the recipe for faster felting!) Add some more soap, I use regular liquid hand soap when I felt, but many professional felters use different kinds. I can't tell the difference between dish soap & hand soap, so I don't think I need to invest in some fancy expensive Olive Oil soap, although if you are a professional, I'd like to hear your thoughts on soap choice!


Felt Vessel Tutorial 13
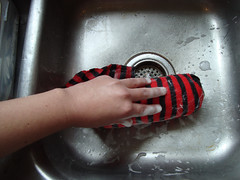
Rub & Scrub... Rub & Scrub... Time to get down to felting. I love wet felting cause it's kind of mindless & I enjoy just working with the fibers & rubbing & scrubbing. It's pretty easy to felt at this stage cause everything is contained in the stocking, but be sure to use a light touch at first, the fibers can still move around. As you feel the wool firm up, you can use a more aggressive rub & scrub.


Felt Vessel Tutorial 14


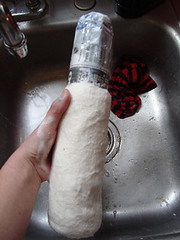
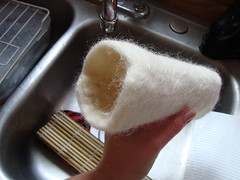
You will be able to see when your vessel is ready to take out of the stockings because you will see fibers start to come through. You want the outer layers to be felted fairly well before you take it out (it will be unruly & might get out of shape if you take it out too soon). Don't worry about the inside not being felted as well, we will take care of that in a couple steps.


Felt Vessel Tutorial 15


Another Tricky step!! Be careful as you pull off the stocking. The fibers that are peeking through the stocking is in fact the vessel being felted TO the stocking. Pull the stocking off your vessel slowly, making sure not to pull apart the felt. Mine came off pretty easy (I tend to over-felt things), but you might have to finesse your nylon away from the felted wool.


Felt Vessel Tutorial 16


You can continue to Rub & Scrub the exposed wool at this point till you feel that it is pretty strong. Then you can take out your shaped form.


Felt Vessel Tutorial 17


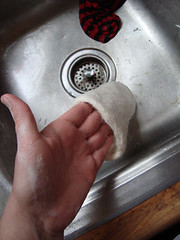
Now it's time to focus on the inside wool & felt that a bit. I started by rubbing & scrubbing the inside with my hand. This can help get the surface layers felted down so that you can really get down to some aggressive felting.


Felt Vessel Tutorial 18


You can turn the vessel inside out! This will definitely get those inner fibers felted down!


Felt Vessel Tutorial 19
I used my trusty felting mat to get some fast felting done! Just rub back & forth over the mat.

*Felting tip - while you are felting at this stage (which is technically called fulling because you are shrinking & tightening the fibers) the piece will shrink in the direction you rub in. i.e. - If you felt the down the length of the vessel it will become shorter.


Felt Vessel Tutorial 20


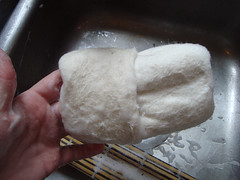
Almost done!! I like to rinse out the soap from the wool by using alternating HOT & COLD water. I feel like when you shock the wool with the temperature change it tightens up the felt. Be sure to rinse out all of the soap, you don't want to have stinky rotting wool later on!


Felt Vessel Tutorial 21

Turn it right-side-out & you are almost done!!! YEA!!!


Felt Vessel Tutorial 22Now's the time to shape you vessel. As long as your wool is thick enough, your felt should be able to keep it's shape as it dries. You can put the vessel back onto your form (althought it might have shrunk a bit & won't fit) or wad up some towels or paper to put into the vessel as it dries. Your vessel should keep it's shape and be able to stand on it's own after it dries!!!

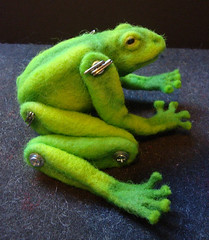
This was a pretty fun project & I think I might take advantage of it as I get more complicated with my felting sculptures. I have some pretty giant ideas & having hollow shapes might come in handy.

Hope you enjoy this tutorial, It took me FOREVER to write up!! Stay warm & have a great day!