
Playing with Casting Resin Tutorial!!!
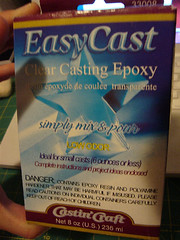
This is the kit that I bought. There were other larger kits available, but I didn't want to spend too much for doing these tests (just in case something tragic happened). I want to look into maybe some less expensive casting resin. People usually use this to cast small embedded jewelry, or paperweights, or to coat biodegradable items like wood or flowers.
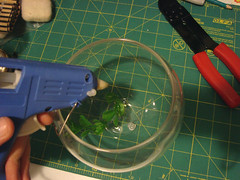
I first hot glued my support wires to the bottom of the glass bowl. This was they will stay in place while the Resin sets. i think it takes like 24-72 hours for the Resin to completely cure. In my previous Fish Bowls, I hot glued the wires w/o the resin & I'm scared they won't last as long as I had hoped. So that's how I came up with the Clear Resin idea!!
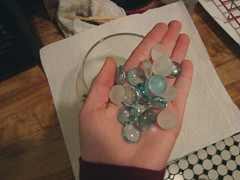
I got these little decorative glass rocks to put in the bottom of this Fish Bowl. I think they look prettier than just using colored aquarium rocks. I got the Aqua Colored ones (in the department that sells glass vases & decoration-type stuff at Target) to look more like water!

So I put the rocks in the bottom of the Fish Bowl. I made sure that the hot glue & wires were covered so that you can't see them.
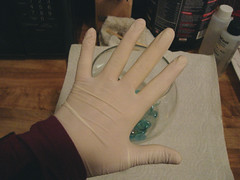 Be sure to wear your safety-gear!!! I've worked with these types of chemicals at my day-job before, & you don't want to get it on your hands. It's not good for you, plus you can't really get it off without using Acetone or something. It's easier to just use a pair of latex gloves & save yourself the trouble!! This is low-odor Epoxy, but some chemicals are very gaseous. If you use any chemical with a strong odor, PLEASE wear a respirator. You can get disposable masks at Home Depot that are Osha rated for fumes, or invest in a hard-core respirator with cartridges.
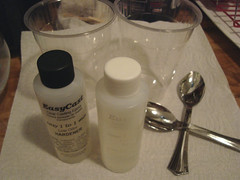
These are the materials that I used for this specific Epoxy. You have the 2 part mix, a couple of cups for measuring & mixing, a couple plastic spoons for mixing, & a cover for the counter.
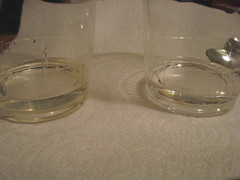
Be sure to read the directions for the specific Casting Resin you have, but this is an easy trick for measuring & mix that I learned from my Scenic Sculpting job. Have 2 of the same cups (clear is preferable). Then measure out equal amounts (I eyeball cause I'm lazy, but you could also mark the cups). Then pour one part of the mix into the other part. Mix. Then you can pour that mixture into the other cup & mix some more, This way you get both parts mixed thoroughly.
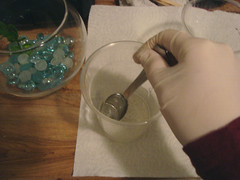
Mix in the first cup for about 2 minutes. Then (like I said before) the directions say to pour into a different cup & use a new stirrer. Pour back into the the other cup. This way you don't waste 4 cups (2 for measuring plus 2 for mixing) but only 2!!! MIX MIX MIX!! You want it to be SUPER MIXED, cause if not, then the resin won't cure correctly & you might have a gooey mess. It's always better to mix too much with non-time sensitive chemicals, than too little.
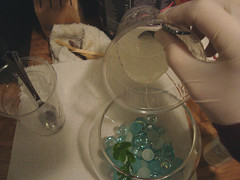
Now pour into the glass bowl. **Be sure to pour carefully so that you don't get any drips on the sides of the bowl. Also be sure to get resin all over the rocks & down into the bottom area to set the wires. I think it would be okay if you didn't mix enough resin at first to add a little more on top WHILE STILL FRESH!! I haven't tried this, so don't blame me if it doesn't work!!

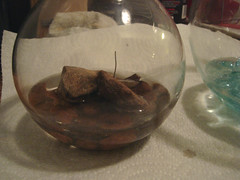
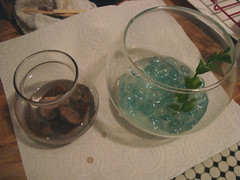
Here are the 2 bowls that I made. One is the Fish bowl, and the other will be a present for my niece. It's natural rocks with a place for some sort of animal... not gonna tell, don't want to ruin the surprise!!
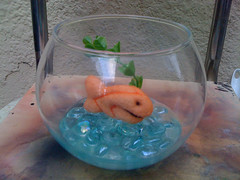
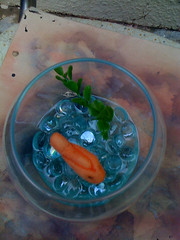
Here's the finished Fishy!! He's cute & quirky & looks right at home in his new Bowl!!! I think I'll be playing around more with this Resin stuff in the future. I'm sure I can come up with all sorts of neat ideas!! This was a great starter, but now my brain is working on bigger & better sculptures to make!!!
That's a cool idea! I've always wanted to play around with that stuff ever since I visited the Saturn Cafe in Santa Cruz. They had tables covered with resin that was embedded with weird items like old pieces of electronics, plastic animals extra. I would have never thought to embed a felty. You're a genius!
ReplyDelete