
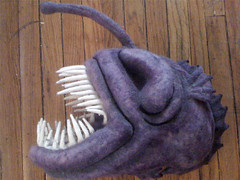
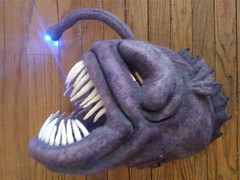
I placed all the teeth in the mouth first using giant T-pins. I wanted to see what she would look like with the teeth in. I was so surprised and excited about how the teeth finally made the whole thing come together!!
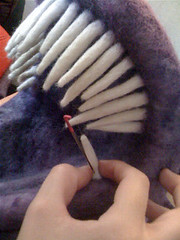
I then felted the teeth into the mouth. I first used the giant 36 gauged needle to really get them attached. Then I went in with the 38 gauged needle to sculpt them into the gums of the mouth.
Here you can see the finished set of bottom teeth compared to the not-so-finished top set. When I felted the teeth in they kinda stuck out too much, so I had to sculpt them to curve into the mouth. This included felting the back of each tooth to help it curve inwards.

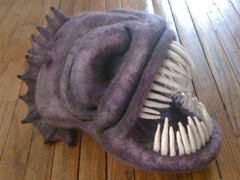
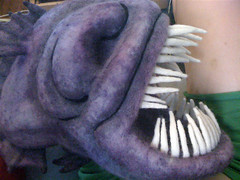
Here he is all toothy!!! I think he looks super awesome!! I have to admit he looks better from the side, and looks alittle too toothy from the front, so even felted sculptures have "Good Sides"!!!!


So after I finished off the teeth it was time to put in the light. I got some conductive thread to use, but felt more comfortable using insulated wire. So I needed to cut a hole from the top of the head through to the eye socket. I then pulled through the wires and had the original coin battery holder all ready to go.


Next it was time to put the wires through the "fishing rod" I cut the rod down the middle to let the wires go in. I did test the wire to see how needling the wire would work, but luckily the coating is thick enough to not get damaged.
*No pictures - But next I felted most of the rod closed, up to where I needed to attach the LED. I also felted the base of the rod to the head.
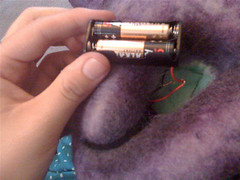

I broke my original blue LED light from playing with it too much. So I had to run to RadioShack & I ended up getting a bigger light. The bigger light meant that the coin battery that I had was a little too weak to make it super bright. So I swapped it out for a 2 AAA battery holder. I had t cut into the socket more for it to fit & will have to do a couple tests to see how long the batteries will last & how hot it gets.

YEA!!! ALMOST DONE!! Just need to finish cleaning up the wires, felting everything closed, make the eye balls, & add some fun colored accents. It feels great to see him come together. So close, I just need to finish!!!!!
No comments:
Post a Comment