
SCULPTING / CARVING TIP: This one I learned from my scenic sculpting job: The easiest way to get your carved piece down to the approximate size is to cut all 3 profiles. I know this sounds kinda confusing, but let me explain. First you want to cutout or measure or plan out the Profile. This is the side view (the one that I did plan out). Next you need to cutout or measure or plan the Silhouette. I'm using the word silhouette to distinguish it from Profile, but the Silhouette would be the front view. Then you need to cutout or measure or plan the Aria View. This would be the top view. By cutting these 3 views straight through a solid shape, you get your shape plus some funky corners than need to be cut off.
EXAMPLE: Let's say you are going to carve a Head-shape out of a cube.
1. You would draw or plan out the profile of your head. This would include the side view of the face with the nose, chin, brow, and curve of the back of your head.
2. You would draw the Silhouette of you head. This would be the frontal view with the oval shape of the head, maybe ears, and jaw line to neck.
3. You would draw the Arial View of the head. What does the head look like from above looking straight down. This would include the circumference of the head and how far the nose sticks out from your face.
So that said, I didn't plan mine out that well. I only plotted out the Profile view, which meant I had SOOOOO much extra material laft over that I was cutting it down for hours. Next time I will definitely plan better before I cut the foam pieces, it is such a waste of material. I had to cut the "Width" of the fish down several inches. Wasted material is wasted money & time.
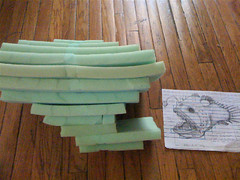
Glued foam ready to start to carve down. Compare this picture to the last one today and see how planning in advance can save you lots of time & material.
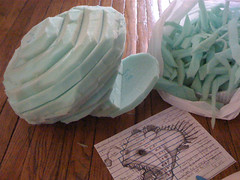
Starting to cut down. I was using my new scissors, which rock, but I might have a new tool to help speed up this carving phase for next time. I'll have to experiment with it, but could be awesome.
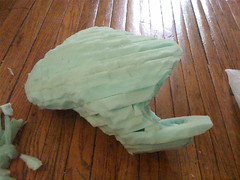
Starting to look kinda like a fish, huh? Still a little boxy shaped. I am always timid to cut so much material off, it's just foam!! I usually start by rounding off corners, then you can see the shape better. Once you don't have lots of sharp edges, you can start to see where material needs to be cut. Starting to define the tail, the nose, the mouth, the jaw. It gets easier & easier the more you cut off.
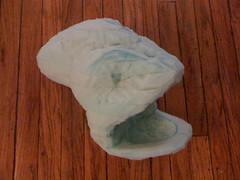
Almost ready to FELT!!! It's hard to see, but you can kinda see the placement of the eyes, the hollowed out mouth, the definition of the nose. I might fine tune the foam a little today, but overall I'm ready to felt over him.
Next comes the tricky part, I'm planning on wet-felting a white wool base felt over the foam. I'm still not quite sure how I'm going to do it without making a complete mess, but we'll see. I want a solid layer of white wool over the base so then I can continue to needle felt and sculpt over top of it.
No comments:
Post a Comment