
I also have been thinking about how my ideas are getting BIGGER & BETTER!! I am getting more ambitious with my ideas, so you know what that means.... bigger & better= more $. I kinda feel bad about making such expensive things, I understand that I could never afford to buy my own work & I will probably not sell them, but I'm ok with that, for now. I will just have to broaden my thinking about selling my work. Maybe I'll look into doing more art shows & galleries.
★★★★★★★★★★★★★★★★★★★★★★★★★★★★★★
CRAFTY HOW-TO:
Dying with Kool-Aid Part II
So I told you I'd share my new fun technique on how I dyed the Gut-Zilla. It's pretty much following the basic Kool-Aid Dying Tutorial that I posted a while back, with a second step added!!
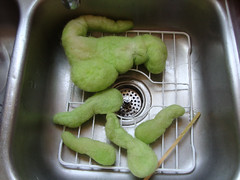
So I first dyed Gut-Zilla in a bath of Yellowish-Green Kool-Aid. Then I rinsed him out & am ready to do the second part of the dye job.

This is my new fancy tool that I tried out on Gut-Zilla. I don't think it ultimately ended up working how I wanted, but it did allow me to apply the dye in a more specific way. I squirted the darker Greenish-Blueish-Orange mix onto the areas that I wanted to make darker. It looked kinda washed out so I decided to continue with the technique I used on the coffee dye with the pufferfish.
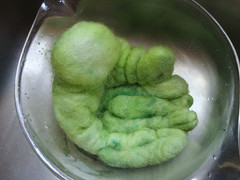
I Layed him top down in a bowl. This allows all the darker dye to sink to the bottom of the bowl so his top just sits in a dark bath. I wanted him to be kinda splotchy, so I wasn't too worried about where the dye ended up soaking in. I didn't add any additional water because there was enough from the squirt bottle.

Here is a bottom view of Gut-Zilla sitting in the dark bath. You can see where he is soaking in the dark green dye. This water will turn clear once the wool has absorbed the Kool-Aid. This is how I dyed the pufferfish with coffee, sitting face down in a bath.
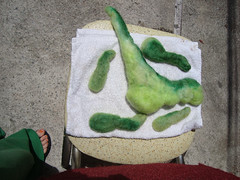
I microwaved him for 2 minutes then let him sit for 2 minutes... for 8 minutes of cooking time & 16 total. Then I rinsed the wool out in some cool water in the sink & let him air dry outside in the sun!!!
** So what I learned... the squirt bottle is interesting, I ended up buying some eyedroppers the other day to try even more specific dying for a later project. I also think I need to used even more concentrated Kool-Aid. I need to use less water, if any at all.
So there you go!!!
i ♥ dying with kool aid! it smells so good, it makes the wool seem like cotton candy ^.^
ReplyDelete