
HOW-TO: Wet Felted Spikes & Cords:
 First you'll need to get your material together:
• A bowl of cold water
• A bowl of warm dish-soapy water
• Some tufts of wool
• A towel (to help control wetness)
• A Bamboo Sushi Mat (or other textured felting surface)
• Some plastic wrap (to help control mess)

Now measure out a tuft of wool. I was making small spikes, so I used a very small thin tuft of wool. I found that you need to break up the wool so that it is short because as you felt it, it will stretch out & be really thin and limp. Remember that even though it may look like a lot of fluffy wool, it will felt down REALLY fast!

Now dip your tuft into the warm soapy water. Since I was making a spike, I want to leave one side dry & fluffy. This will give you a good "flange" of wool to felt to another surface. If you are making a cord or snake, then you can just dip the whole thing in!

Alright, ready to start felting!! It looks all limp & loose now, but not for long.
**THIS IS MY FAVORITE PART OF THE WHOLE TUTORIAL....
Create animated gif
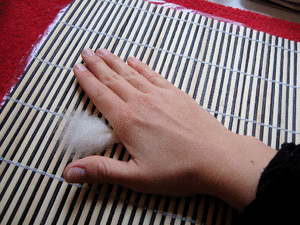
Now start to felt on top of the Bamboo Mat. Be sure to be gentle at first, the wool will be very loose and want to stretch out & come apart. If you start gently rolling the wool back and forth, it will start to firm up & felt together. DON'T roll in just one direction, it will just wrap around itself and not felt from the inside out. Now just keep dipping the wool into the warm water & rolling it on the mat. It won't take very long to felt, only a couple of minutes.

Here is the little spike after a couple of minutes of felting. Stay away from the edge if you want to keep it a spike. See the fluffy end at the bottom, this fluff will help you seamlessly felt your spike to a felt base.
Dip & Roll... Dip & Roll...

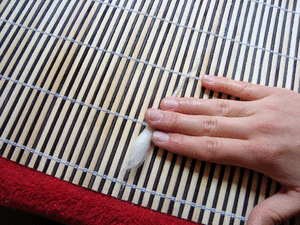
When your spike is pretty firm, dip THE WHOLE THING (fluff included) into the cold water to rinse the soap out. The cold water will not only rinse the soap out, but also shock the wool, which will help you firm & felt it up even more.
**HERE WE GO AGAIN!!! (sorry just figured out how to make a GIF animation & am really excited how it helps illustrate process. You'll be seeing alot more of this now that I know how to do it!!!)
Create animated gif
Just keep rolling & rinsing. You'll see when the spike or cord is done felting when... well... it just wont felt anymore. This whole Dip & Roll process will take only a couple minutes when using a small tuft. I guess if you don't have a Bamboo Mat or other textured felting surface, you could probably just use your hands and rub the wool between them. Like when you were a kid & you made clay snakes. This would take alot longer than if you use another surface. Try using whatever you have around the house as a Felting surface: drawer liner, non-slip floor mat, silicone oven mitt, paint tray liner, etc.

This is what your spike will look like when you finish felting. It's a little on the rough side, if that's how you like it... uh... But just let it air dry.
 I like my felting to be pretty clean, so I needled my spike, just a little to tighten them up even more & poke in all the fly-a-way fibers.
*Note: Never feel like you cannot mix felting techniques. If you try wet-felting something & it doesn't turn out right, go ahead & needle felt over it!! There are no rules when felting. They all do the same job, just in different ways. Don't be a felting "elitist" or "purest". Whatever get the job done for you!

It's so hard for me to get crisp points with felt. So with these spikes I cut off the very wispy end of the wool & needle-felted directly into the tip. This firms up the tip a little. Then you can just clip any stray hairs that may still be sticking around.

If you are making cords or snakes, you are pretty much done at this point. But if you are making spikes, now is the time to take advantage of that fluffy end you left. Take the fluffy end of non-felted wool, thin & spread it out to create an awesome flange to felt. This will help you attach the spike solidly & easily, without adding alot of extra wool.

Now just place your spike wherever you want it, and felt it on!!! I'm not a wet-felting expert, but I think you can also wet-felt it on.
DONE!!!!!
YEA!!! Thanx!! I hope you enjoy this fun & animated tutorial. If you have any suggestions or comments, please feel free to comment on my blog. I'll be posting pictures of my spikes in action soon. Maybe I'll plan for the end of the week (hopefully).
HAVE FUN!!!
when you needle felt it to the other felted surface, do you just stick the needle in all over, and then it will just stick on?
ReplyDeleteLoved this tutorial over others. So can you do one showing us newbies how to make curly cues at the end of ropes?
ReplyDeleteAwesome! And a tut' on curly cues would indeed be extremely welcome as well! :)
ReplyDeleteBest regards from Eva Mari in Norway
Hi there just to say thankyou for this tutorial which has helped me a lot, I’m needlefelting seed pods and couldn’t work out how to make the spiky bits, they just kept being floppy. I’m now going to totally change tack and use your wet felt method before attaching them to the main “pod”. I notice you made this post 7 years ago, see how your generosity keeps giving!
ReplyDeleteHi,
ReplyDeleteSo excited I found this post!! Thank you!
If I needle felt a bunch of spikes onto a felt background, is it strong and secure long term? It won't come apart will it?
Thanks, Sallyee
Hi, thanks for the tutorial, am going to give it a go right now 😊
ReplyDelete