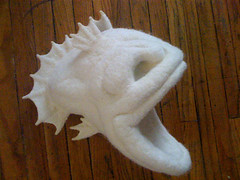
OMG!! I felted my arm off yesterday. I really really really wanted to finish the sculpting yesterday so that I could move onto dying for today, so I sat myself down, and felted for about 5 hours. I even made Lance go away so that he wouldn't distract me away from finishing. I got his body all done, and I'm really excited to start dying today!!

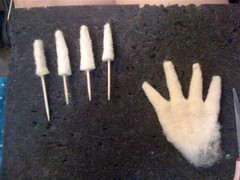
I spent Day 11 making all these toothpick cover spikes. Check out my previous post to see how I made them. I had a comment on how felting over an armature can be tricky, because of the fear of breaking needles. I think with practice you learn to avoid the wire or toothpick. I also don't felt very aggressively, you don't need to poke so hard you go into the foam, so this also helps when I hit the wire, I don't break my needle. They do bend a little, but are still usable.


I then cut the wool off of the toothpicks to size them. I laid them out on top of a tuft of "core" wool. This helps keep them in place and creates the solid part that will eventually attach to the body. Be sure to keep the bottom (part that is attached) all nice and fluffy so you have the wool already there to attach.


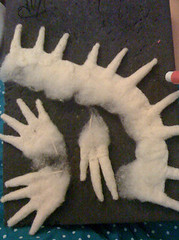
Now the tail fin was a little more tricky. I loosely laid out the shape by holding the body above the toothpicks. The fin will be flexible, so it won't be that hard to adjust it to attach. I also made it in sections cause it was a bit big & unruly. Keep things simple & manageable to keep the frustration level low.

Here are all of the different fins ready to have some white Romney wool to felt over the top. The white wool with be sculpted to make the webbing shape between the spikes. Also with the prefelted spikes it lets them stand out with a bit more shape between the thinner webbed parts.

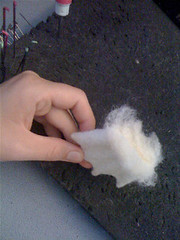
You can see how I felted the wool in between the spikes. Then I felted down into the solid part to give the spikes more shape. Be sure to felt down into the webbed part (without poking your fingers) this will stiffen the thin wool and help sculpt it into the arched shape.

You can tell I'm not really into writing this post today, because I'm being pretty direct and not that descriptive. I think my impatience to get to the dying part is being translated into even posting the before steps. Sorry.

All done with sculpting the fins!! Now it's time to attach them to the body. I was smart with leaving plenty of fluffy wool on the end so I have a built in "glue". I broke off the extra ends of the toothpicks. The fins are solid enough that they will stand up on their own, but be sure to felt them very well into the body so that they have enough strength to stand up by themselves.


I place the fins where I wanted them. Then poked them deeply into the foam. You can't really felt too much, so I kept poking with the large 36 gauge needle to really get contact. Then I covered the seam with some small tufts of white wool.


He's all ready to dye!!!! Yea!!! I'm really excited, I should have done a sample of dye yesterday too, but whatever, I'm going to jump right into it!! I haven't sculpted the "fishing rod" part for his head because of the electronic part I want to add on, so I'm putting it off till I figure out how I'm going to do it. I will save some dye though, so I can felt it, dye it, and attach it later. Today I'm going to have some fun with color!! He looks super cool now, but just wait!!!!!!!!!!
 I spent Day 11 making all these toothpick cover spikes. Check out my previous post to see how I made them. I had a comment on how felting over an armature can be tricky, because of the fear of breaking needles. I think with practice you learn to avoid the wire or toothpick. I also don't felt very aggressively, you don't need to poke so hard you go into the foam, so this also helps when I hit the wire, I don't break my needle. They do bend a little, but are still usable.
 I then cut the wool off of the toothpicks to size them. I laid them out on top of a tuft of "core" wool. This helps keep them in place and creates the solid part that will eventually attach to the body. Be sure to keep the bottom (part that is attached) all nice and fluffy so you have the wool already there to attach.
 Now the tail fin was a little more tricky. I loosely laid out the shape by holding the body above the toothpicks. The fin will be flexible, so it won't be that hard to adjust it to attach. I also made it in sections cause it was a bit big & unruly. Keep things simple & manageable to keep the frustration level low.
 Here are all of the different fins ready to have some white Romney wool to felt over the top. The white wool with be sculpted to make the webbing shape between the spikes. Also with the prefelted spikes it lets them stand out with a bit more shape between the thinner webbed parts.
 You can see how I felted the wool in between the spikes. Then I felted down into the solid part to give the spikes more shape. Be sure to felt down into the webbed part (without poking your fingers) this will stiffen the thin wool and help sculpt it into the arched shape.
 You can tell I'm not really into writing this post today, because I'm being pretty direct and not that descriptive. I think my impatience to get to the dying part is being translated into even posting the before steps. Sorry.
 All done with sculpting the fins!! Now it's time to attach them to the body. I was smart with leaving plenty of fluffy wool on the end so I have a built in "glue". I broke off the extra ends of the toothpicks. The fins are solid enough that they will stand up on their own, but be sure to felt them very well into the body so that they have enough strength to stand up by themselves.
 I place the fins where I wanted them. Then poked them deeply into the foam. You can't really felt too much, so I kept poking with the large 36 gauge needle to really get contact. Then I covered the seam with some small tufts of white wool.
 He's all ready to dye!!!! Yea!!! I'm really excited, I should have done a sample of dye yesterday too, but whatever, I'm going to jump right into it!! I haven't sculpted the "fishing rod" part for his head because of the electronic part I want to add on, so I'm putting it off till I figure out how I'm going to do it. I will save some dye though, so I can felt it, dye it, and attach it later. Today I'm going to have some fun with color!! He looks super cool now, but just wait!!!!!!!!!!

Great job he looks amazing and I think it's great you show how much work goes into each fin as they are "little sculptures" in themselves . I don't think some people realize how much work goes into needle felting .
ReplyDeleteNo kidding!! I don't work full time on it (I should), but definitely hours a day. That's why I'm always experimenting & looking for short cuts & "tricks of the trade". I think I might be making up my own, cause I'm too impatient to do things the right way, so that's why I'm sharing!!
ReplyDelete